
Part 2. Deploying Tibero7 TAC on Nutanix HCI: Building a Highly Available Virtualized Database Environment


In Part 1: Tibero7 Compatibility Validation and Architecture Analysis on Nutanix AHV-based HCI, we explored the fundamentals of Hyperconverged Infrastructure (HCI), the key components of the Nutanix platform, and the significance of Tibero7 achieving Nutanix Ready Validation.
We also discussed how Tibero7 delivers enterprise-grade stability, platform compatibility, and operational reliability when deployed on a Nutanix AHV-based infrastructure.
In this second installment, we focus on the actual deployment process of Tibero7 within a Nutanix HCI environment.
We begin with a brief introduction to Tibero Active Cluster (TAC) and Tibero Active Storage (TAS)—the technologies that provide Tibero’s high availability architecture. We then describe the validation environment and reference architecture used for the Nutanix Ready Validation program.
Finally, we walk through the deployment process step by step, covering virtual machine provisioning, operating system installation, and the configuration of shared storage using Storage Containers and Volume Groups. Together, these steps demonstrate how to successfully deploy a highly available Tibero7 environment on Nutanix HCI.
5. Validation Environment and Objectives
5.1 Tibero Active Cluster (TAC) and Tibero Active Storage (TAS)
Before discussing the validation process, it is helpful to briefly review Tibero Active Cluster (TAC) and Tibero Active Storage (TAS), which together provide the foundation for Tibero’s high availability architecture.
TAC(Tibero Active Cluster)
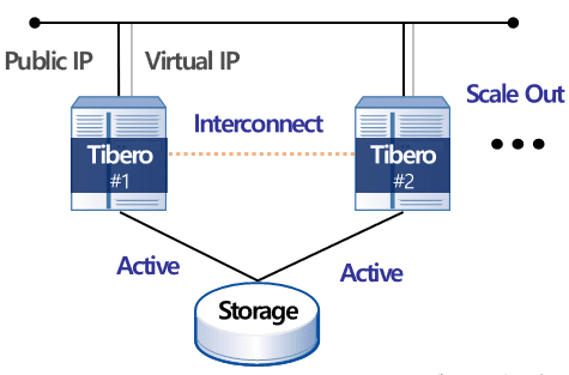
Tibero Active Cluster (TAC) is Tibero’s active-active clustering solution, designed to deliver both high availability and horizontal scalability.
Within a TAC cluster, all database instances access and process transactions against a shared database. Access to shared data is coordinated through distributed concurrency control mechanisms that maintain data consistency and transactional integrity across all participating nodes.
Unlike replication-based architectures, TAC adopts a shared-disk cluster architecture, resulting in a fundamentally different approach to high availability.
Traditional Active-Standby architectures require a failover process when the primary node becomes unavailable. Although this minimizes downtime, service interruptions and session disconnections may still occur during the transition.
By contrast, Tibero TAC is designed with the goal of database-level continuous availability. If one instance becomes unavailable, the remaining active instances continue processing workloads immediately, allowing database services to remain available without requiring a database restart or storage failover.
This architecture makes TAC particularly well suited for mission-critical environments such as government, financial services, telecommunications, and other enterprise systems where uninterrupted database availability is essential.
TAS(Tibero Active Storage)
Tibero Active Storage (TAS) is Tibero’s native storage management layer that enables shared-disk clustering without relying on third-party storage software.
TAS integrates logical volume management (LVM) and a cluster-aware file system into a unified storage layer for managing database files, redo logs, and other Tibero storage resources.
One of TAS’s key advantages is its built-in support for shared-disk clustering.
Traditionally, shared storage for clustered databases required external technologies such as Cluster File Systems (CFS) or Raw Devices. TAS eliminates these dependencies by providing native shared storage capabilities within the Tibero platform itself.
As a result, organizations can deploy highly available storage architectures using Tibero alone, reducing operational complexity while minimizing dependence on external storage software.
5.2 Validation Objectives and Test Environment
The primary objective of this validation was to verify that Tibero7 can be successfully installed and operated on a Nutanix AHV-based HCI platform while satisfying all requirements of the Nutanix Ready Validation program.
Both Single Instance and Tibero Active Cluster (TAC) deployments were validated. Although both deployment models were tested, the deployment procedures described in this article focus primarily on the TAC configuration.
Validation Environment
| Component | Specification |
| Database | Tibero7.2.5 |
| HCI Platform | Nutanix |
| AOS Version | 7.5 |
| AHV Version | 11.0 |
| Guest Operating System | Rocky Linux 9.4 |
| Deployment Models | Single Instance, Tibero Active Cluster (TAC) |
Validation Scope
The validation included the following scenarios:
- Installation, startup, and shutdown of Tibero7 Single Instance and TAS-based TAC
- Online resource scaling (CPU, memory, and storage)
- Live node migration between Nutanix clusters
- Virtual machine cloning
- Nutanix VM snapshots
TAC Validation Architecture
The TAC validation environment consisted of two Tibero nodes connected through separate public and interconnect networks.
The public network handled client connections and application traffic, while the interconnect network was dedicated to cluster communication between TAC nodes.
This network separation is essential for ensuring reliable cluster coordination and maintaining consistent database performance.
For storage, the environment utilized both Storage Containers and AOS Volume Groups.
Local virtual disks were provisioned through Storage Containers, while shared storage required by TAS was implemented using AOS Volume Groups configured in Shared Mode.
The shared Volume Group was attached simultaneously to all virtual machines participating in the TAC cluster, allowing every database instance to access the same shared storage devices.
Validation Goals
The validation was designed to demonstrate the following:
- Successful deployment of Tibero7 on Nutanix AHV
- Reliable operation of both Single Instance and TAC configurations
- Proper recognition and utilization of shared storage through TAS
- Stable communication between clustered database nodes
- Compatibility with Nutanix virtualization and storage services
- Compliance with the technical requirements of the Nutanix Ready Validation program
Collectively, these validation scenarios verified that Tibero7 can operate as an enterprise-grade database platform within a Nutanix HCI environment while delivering the high availability and operational reliability required for production deployments.
6. Overall Architecture of Tibero7 on Nutanix
In this validation, Tibero7 was deployed on Nutanix AHV virtual machines to verify both Single Instance and Tibero Active Cluster (TAC) configurations.
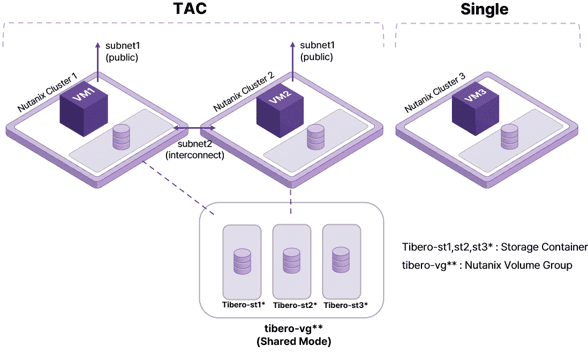
In a TAC deployment, two Tibero nodes work together as a single clustered database.
Each node runs in its own independent virtual machine while sharing access to the same storage resources through Tibero Active Storage (TAS). In addition, the nodes communicate over two dedicated network interfaces: a public network for client access and an interconnect network for cluster communication.
Note: In this article, clustered database refers to a Tibero Active Cluster (TAC). This should not be confused with a Nutanix Cluster, which represents the underlying infrastructure cluster responsible for hosting and managing virtual machines.
As discussed earlier, shared storage is the foundation of a TAC deployment.
Nutanix provides two methods for attaching storage to virtual machines:
- Virtual disks (vDisks) provisioned from a Storage Container
- Shared storage presented through an AOS Volume Group
For this validation, shared storage required by TAS was implemented using an AOS Volume Group.
The Volume Group was configured in Shared Mode and attached simultaneously to every virtual machine participating in the TAC cluster, enabling all database nodes to access the same shared disks.
It is important to distinguish between Storage Containers and Volume Groups.
A Storage Container is a logical storage pool within the Nutanix platform that hosts virtual disks. It is not the mechanism used to provide shared-disk access.
Shared storage is implemented by creating a Volume Group, adding virtual disks to that group, enabling Shared Mode, and attaching the Volume Group to multiple virtual machines.
Note: Configuring a Storage Container for shared usage does not by itself create a shared-disk environment for guest operating systems. Multi-VM shared storage is achieved through Volume Groups configured in Shared Mode.
Another important aspect of TAC deployment is network configuration.
Additional virtual network interfaces can be added after virtual machine creation using Prism. However, newly attached interfaces are initially inactive within the guest operating system and must be manually enabled after logging into the VM.
7. Virtual Machine Provisioning and Operating System Installation
The deployment process began by creating virtual machines through Nutanix Prism Central.
During VM provisioning, administrators specify the virtual machine name, target Nutanix cluster, virtual hardware configuration, storage devices, and network assignments.
For this validation, Rocky Linux 9 was selected as the guest operating system.
The Rocky Linux installation ISO was attached as a virtual CD-ROM during VM creation. Both the public and interconnect network subnets were connected to the virtual machine, while IP addressing was configured using either DHCP or static IP addresses, depending on the deployment environment.
The following procedure was repeated to provision both TAC nodes.
Step 1. Create a Virtual Machine
From Prism Central, select Create VM.

Step 2. Configure Virtual Machine Resources
Specify the following:
- Virtual machine name
- Target Nutanix cluster
- vCPU allocation
- Memory size

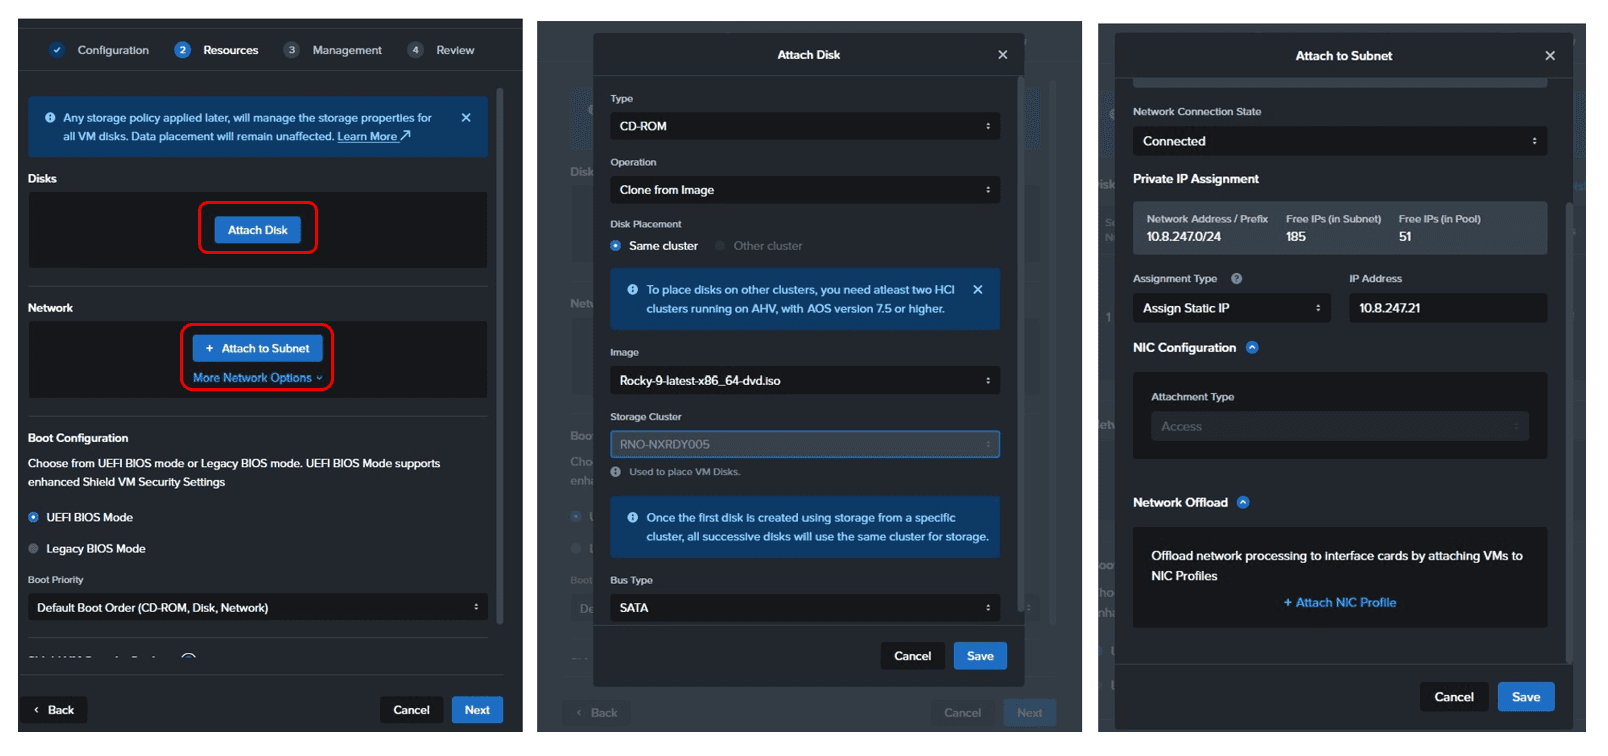
Step 3. Attach Installation Media and Networks
Attach the Rocky Linux installation ISO as a virtual CD-ROM.
Then connect the virtual machine to both:
- Public subnet
- Interconnect subnet
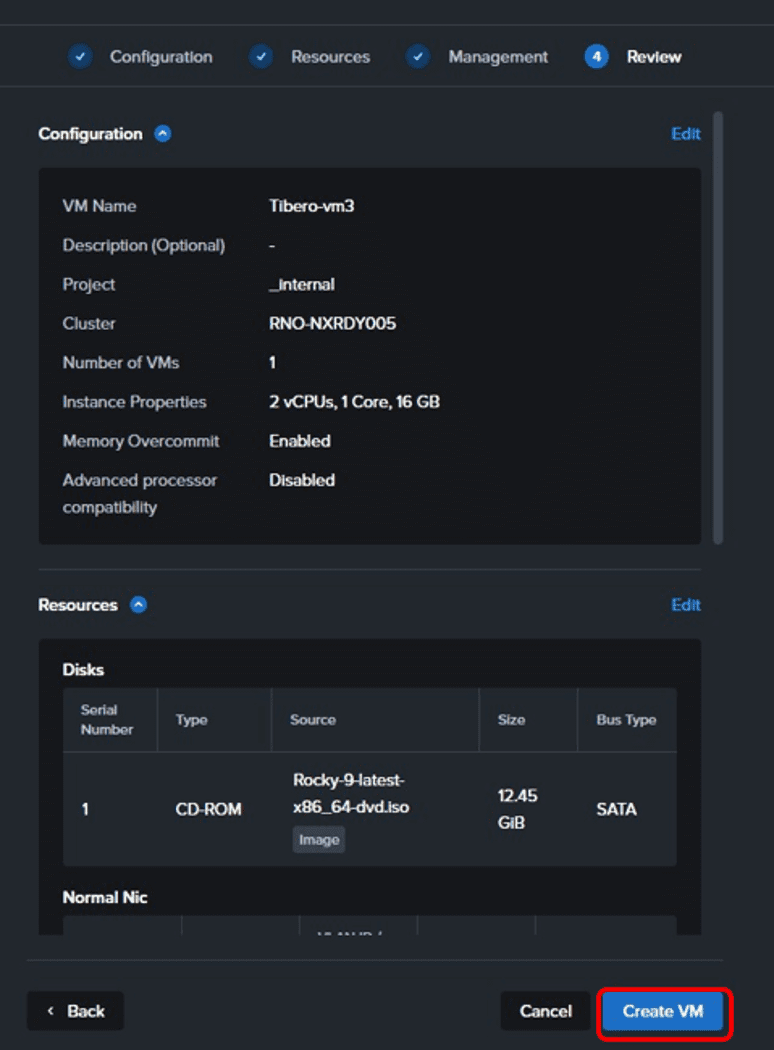
Step 4. Review and Create the Virtual Machine
After verifying all configuration settings, create the virtual machine.
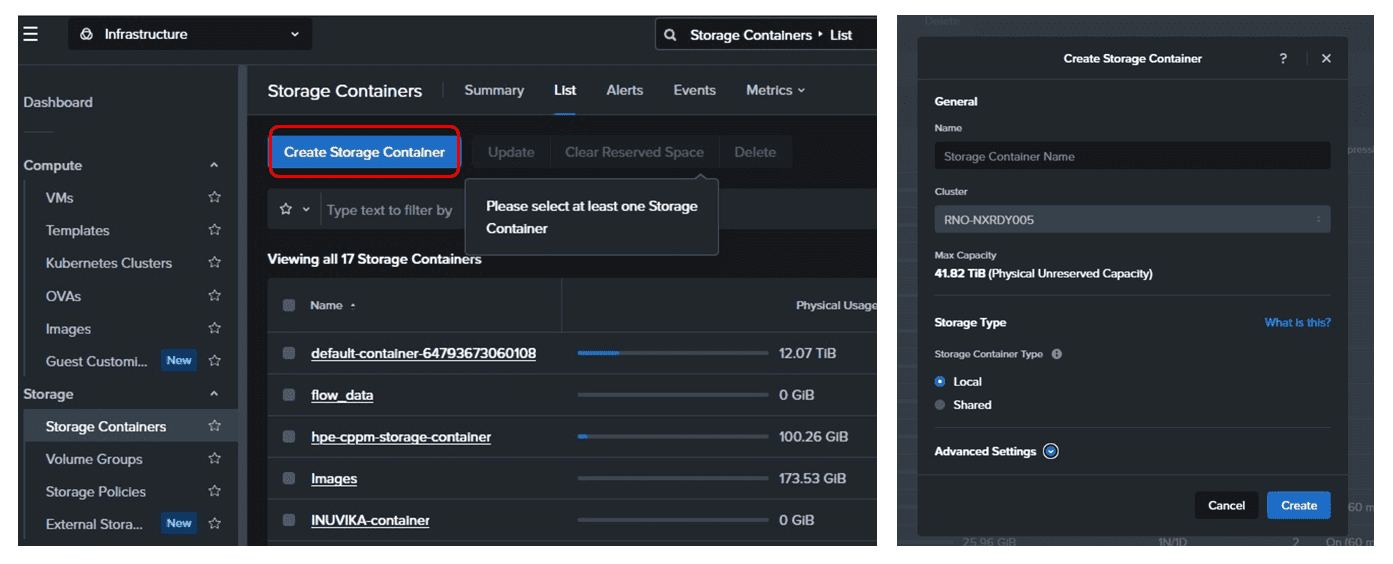
Step 5. Create a Storage Container
Create a Storage Container that will host the virtual disks used by the operating system.
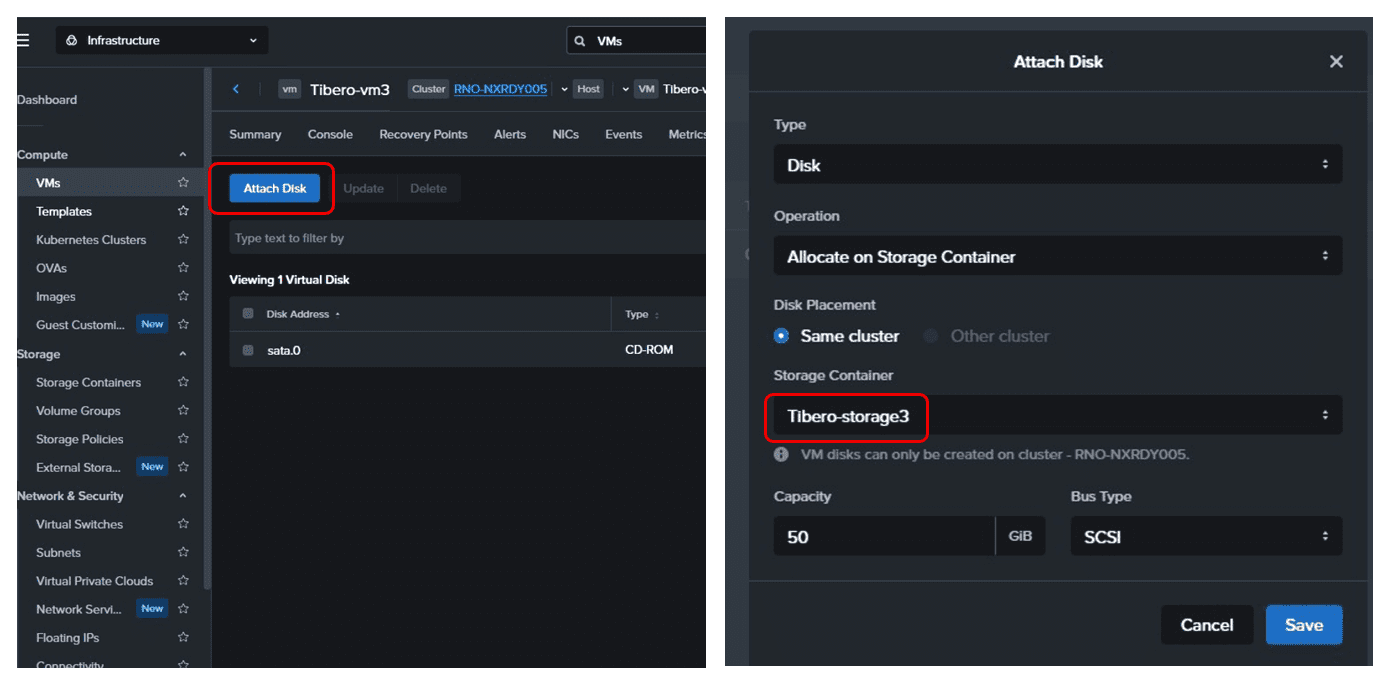
6) Provision Virtual Disks
Allocate one or more virtual disks (vDisks) from the Storage Container and attach them to the virtual machine.
These virtual disks are used for operating system installation and local storage.
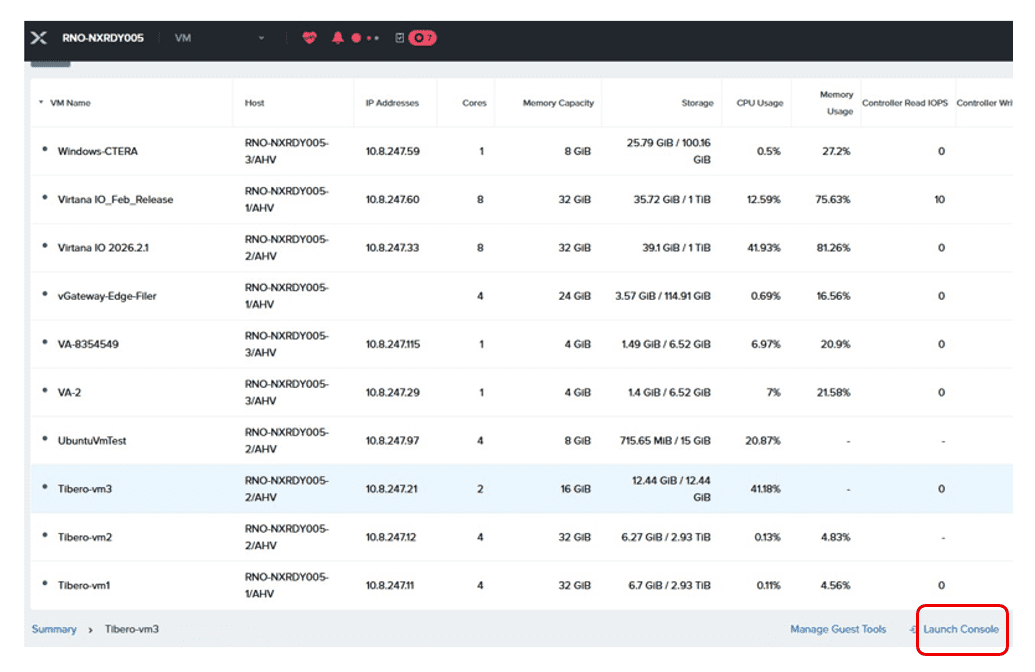
7) Launch the Virtual Machine
Open Prism Element and launch the VM through the Launch Console option.
Installing Rocky Linux
Once the virtual machine has booted from the installation media, install Rocky Linux using the standard installation process.
The installation procedure is identical to that of a physical server and includes:
- Disk partitioning
- Network configuration
- User and authentication settings
- Operating system installation
After the installation is complete, log in to the guest operating system and verify that all network interfaces and storage devices have been detected correctly.
Enabling Newly Added Network Interfaces
By default, network interfaces added through Prism are not automatically activated within the guest operating system.
Each newly attached NIC must be manually enabled after logging into the Linux VM.
This step ensures that both the public network and interconnect network are available before proceeding with TAC configuration.

Deployment Summary
At this stage, each virtual machine has been prepared with:
- Rocky Linux 9 installed
- Public and interconnect network interfaces configured
- Local storage provisioned through a Storage Container
- A foundation ready for configuring shared storage and installing Tibero7
The next step is to configure shared storage using Storage Containers and Volume Groups, which enables Tibero Active Storage (TAS) and ultimately allows the TAC cluster to be established.
8. Configuring Shared Storage with Storage Containers and Volume Groups
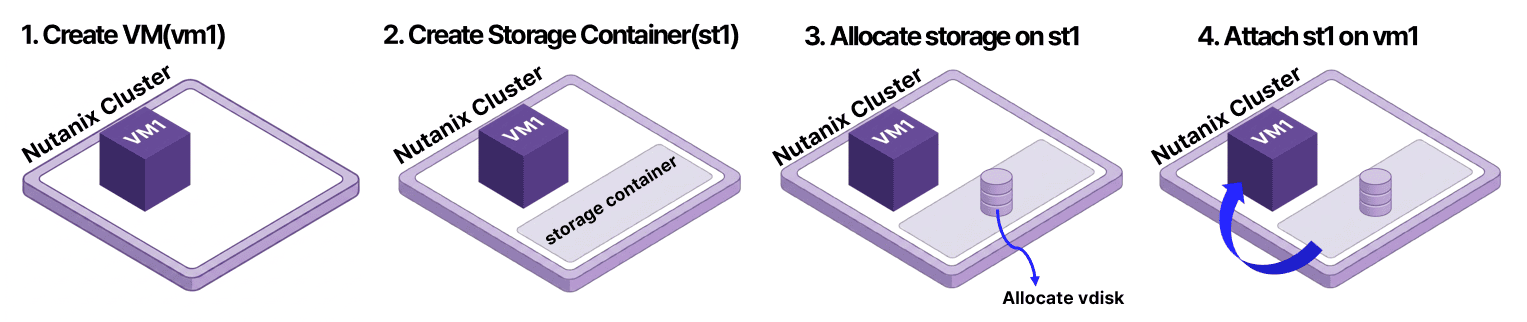
A Storage Container is a logical storage pool within a Nutanix cluster that serves as the foundation for provisioning virtual disks.
After a Storage Container is created, administrators can allocate one or more virtual disks (vDisks) from the available storage capacity and attach them to virtual machines.
Storage Containers are typically organized according to operational policies, workload characteristics, or storage management requirements, allowing administrators to separate storage resources for different applications or environments.
Shared Storage for Tibero Active Cluster
In a Tibero Active Cluster (TAC) environment, shared storage is a mandatory component because all database instances must access the same storage devices through Tibero Active Storage (TAS).
To provide this shared storage, Nutanix uses Volume Groups.
It is important to note that a Nutanix Volume Group is not equivalent to a Linux Logical Volume Manager (LVM) Volume Group. Although they share similar terminology, they serve entirely different purposes.
A Nutanix Volume Group is a storage abstraction that groups one or more virtual disks into a logical unit that can be attached to one or multiple virtual machines.
When configured in Shared Mode, the same Volume Group can be simultaneously attached to every virtual machine participating in the TAC cluster, enabling all database nodes to access the shared storage required by TAS.
Shared Storage Configuration
For this validation, the shared storage environment was configured as follows.
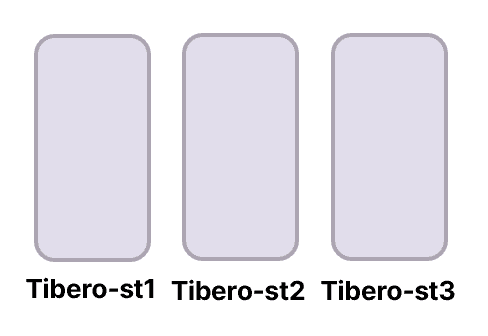
Step 1. Create Three Storage Containers
Three Storage Containers were created to represent the three TAS failgroups used in the shared storage configuration.
Step 2. Allocate Virtual Disks
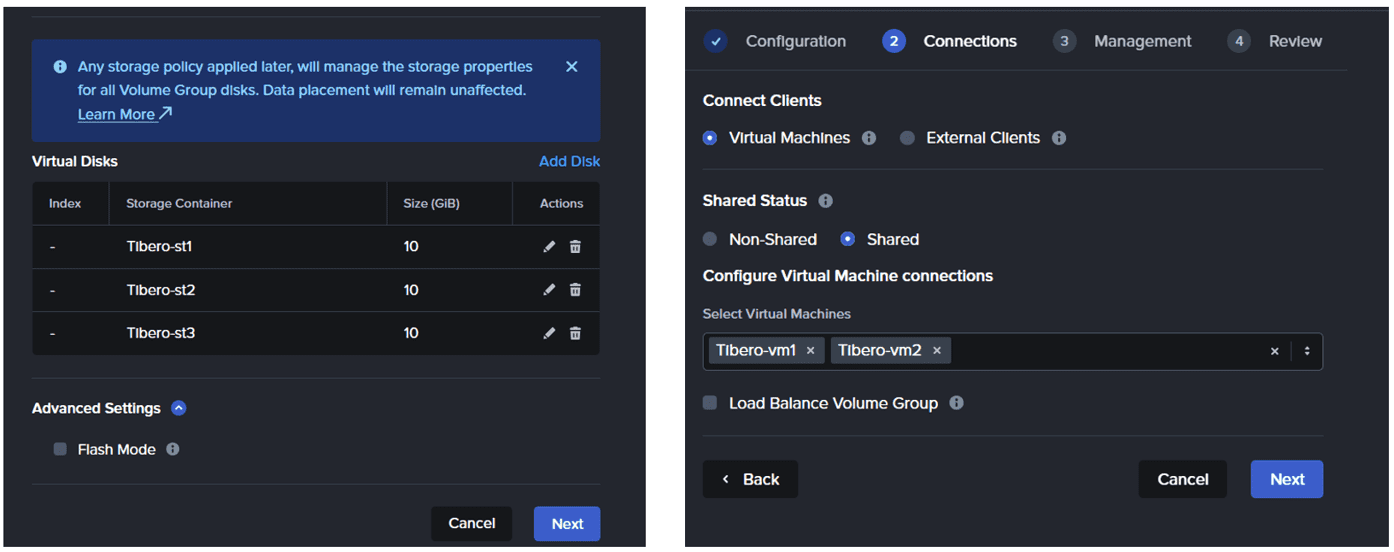
A virtual disk (vDisk) was provisioned from each Storage Container.
Although multiple virtual disks can be created within a Storage Container, one disk was allocated from each container for this validation.

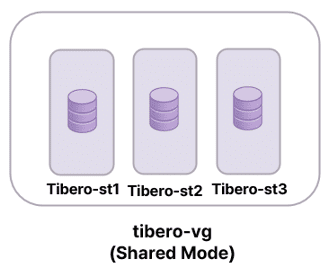
Step 3. Create a Volume Group for TAC
A new Volume Group was created using Prism Central.
This Volume Group serves as the shared storage device presented to the TAC nodes.

Step 4. Configure Shared Mode
The three virtual disks created in the previous steps were added to the Volume Group.
The Volume Group was then configured in Shared Mode, allowing multiple virtual machines to access the same storage devices simultaneously.

Step 5. Attach the Volume Group to Both Virtual Machines
The same Volume Group was attached to both TAC virtual machines.
This configuration presents identical shared storage devices to every node in the cluster.

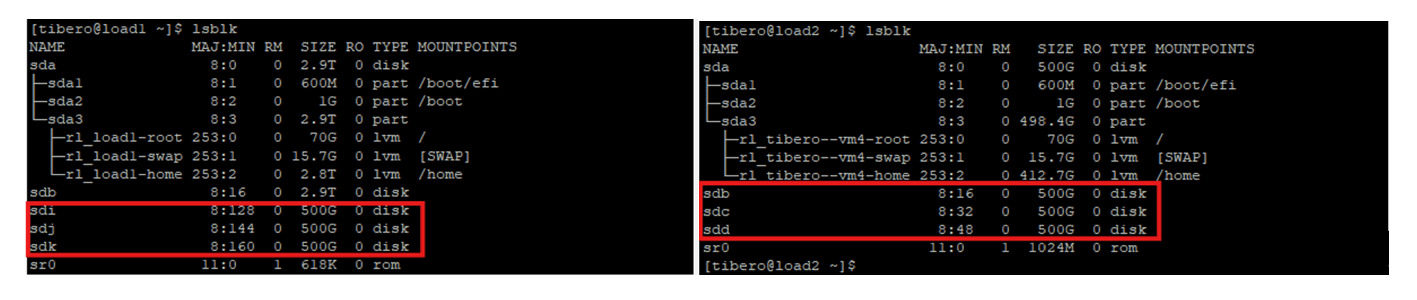
Step 6. Verify Shared Storage within the Guest Operating System
Finally, the shared disks were verified from within each guest operating system to ensure that every TAC node recognized the same shared storage devices.
Once confirmed, the shared disks were ready to be configured by Tibero Active Storage (TAS).
Conclusion
In this article, we explored the architecture and deployment process used to validate Tibero7 TAC on a Nutanix AHV-based HCI platform.
Beginning with the validation environment and overall architecture, we walked through each stage of the deployment process, including virtual machine provisioning, operating system installation, and the configuration of shared storage using Storage Containers and Volume Groups.
The validation demonstrated that Tibero7 can successfully implement a TAC-based high availability architecture within a Nutanix HCI environment while integrating seamlessly with Nutanix virtualization and storage services.
This confirms that Tibero7 is well suited for organizations seeking to deploy enterprise database workloads on modern HCI platforms without compromising availability, scalability, or operational reliability.
What’s Next
In Part 3, we will examine the results of the Nutanix Ready Validation in greater detail.
The next article will cover a range of operational scenarios—including virtual machine migration, VM snapshots, online resource scaling, and other day-to-day infrastructure operations—to demonstrate how Tibero7 behaves in a production-oriented Nutanix environment.
Part 3. Validating Tibero7 on Nutanix AHV: Operational Testing and Nutanix Ready Validation Results





No Comment! Be the first one.